468x60 Ads

This is an example of a HTML caption with a link.

car lukis BOMB


how to draw an mk2 hand grenade step 1

STEP 1.

 Okay in this first drawing step you will start by drawing out the cup shaped body of the grenade as shown. Once you have that done you can then draw all the vertical lines that cover the shell, there is a total of three vertical lines. Next you will add the horizontal lines, this time there is four. After you get that done you will ten draw out the guidelines for the cap and safety lever.
how to draw an mk2 hand grenade step 2

STEP 2.

 Okay you will now start using the guidelines you drew on the shell to make the pineapple shaped blocks that go all around the grenade. Make sure that when you are drawing these squared blocks out, the top is drawn on a rounded angle. After that you will then detail the mid part of the cap.
how to draw an mk2 hand grenade step 3

STEP 3.

 You will now start detailing the square blocks to make them look three dimensional. All you will do is draw out the lines in a block format like you would when you draw block letters. After you are done with this step yo0u can then move onto the next.
how to draw an mk2 hand grenade step 4

STEP 4.

 This is your last drawing step. What you will first do is carefully erase all the guidelines and shapes that you drew back in step one. After you have done that you can then draw a double circle for the shape of the pin that is embedded in the hand grenade. After that draw the rest of the safety handle as shown which is long and slightly curved.
how to draw an mk2 hand grenade step 5

STEP 5.

 When you are done your grenade should come out looking like the one you see here. All you have to do now is color it in and that is it. I hope you liked this drawing tutorial on how to draw a MK2 hand grenade step by step. I will be back with another tutorial in a bit so stay tuned.
READ MORE

cara lukis perry


how to draw perry the platypus from phineas and ferb step 1

STEP 1.

 Start with an oblong shape that resembles an egg for the frame of Perry the Platypus. You will then draw a line for his tail and then the guidelines for his face or bill.
 
how to draw perry the platypus from phineas and ferb step 2

STEP 2.

 Next, using the facial guidelines that you drew in step one start drawing out the two circle shapes for his eyes and then add the pupils as well as shade them in. You will then begin drawing out the bill lining and shape before you leave this step.
 
how to draw perry the platypus from phineas and ferb step 3

STEP 3.

 Now that your drawing is almost done you will start drawing out the body lines for Perry the Platypus as you see here. His body is almost like a rounded off box shape. That lever shape that you see on the butt end is his leg. To end this step you will draw out the rest of Perry's bill.
 
how to draw perry the platypus from phineas and ferb step 4

STEP 4.

 In this step you will finish off the body of Perry which includes his front legs and his big flat tail. Sketch out his few pieces of hair and then color them in.
 
how to draw perry the platypus from phineas and ferb step 5

STEP 5.

 draw out the back leg and then his flat back feet. Draw the waffle lines in his tail and then start erasing all the guidelines that you drew in step one to clean up your drawing.
 
how to draw perry the platypus from phineas and ferb step 6

STEP 6.

 This is what your character should look like when you are done and you have just finished this tutorial on "how to draw Perry the Platypus from Phineas and Ferb step by step". Color him in and you are good to go.
 
READ MORE

cara lukis beruang comel


how to draw a cute panda step 1

STEP 1.

 First, start off with a large oval for the base of the head. Then, draw your guidelines. I prefer to use a ruler in order to draw the guidelines perfectly. Usually, I freehand the circles and then swiftly sketch the guidelines on. For the base of the body, draw a shape similar to the body of the main image. This way, you'll be able to whip up the rest of it's body in no time. I hope learning how to draw cute pandas won't be a hassle in this tutorial!
 
how to draw a cute panda step 2

STEP 2.

 Ok, this step is very simple. See how I start off with the most simplest of shapes? This is ideal to creating things quickly, especially if your drawing in school or work. Start off with a circle for the head. Basically retracing the oval you created in step 1. Once you've done that, move onto the oval eye spots.
 
how to draw a cute panda step 3

STEP 3.

 Continue in this step by drawing the eyes and ears. Again, this is a very simple step to completing the most cutest panda ever! Make sure you draw a panda head over sized in order to contain cuteness.
 
how to draw a cute panda step 4

STEP 4.

 Ok, now you'll have to draw the cute little nose and mouth. I always draw the mouths with a rounded "W". If you get stuck on this part, think of a "W" shape. Next, draw the shoulders and nose.
 
how to draw a cute panda step 5

STEP 5.

 In this step, complete the rest of the body by drawing the soles of the feet and bottom. This is pretty easy. The legs and feet seem a bit merged, this is actually a good thing. It will make your cute panda drawing a lot cuter.
 
how to draw a cute panda step 6

STEP 6.

 This is basically the last step to completing your cute panda drawing. Finish off the details of the soles of the feet. After, draw the indication lines of its markings.
 
how to draw a cute panda step 7

STEP 7.

 This is what the line art should look like once you've finished your drawing. See how cute it is? I can't stop myself from looking at it's adorable face. I spent a lot of time drawing this little cute guy. Drawing things simply makes it harder to draw. I hope you enjoyed this lesson folks, please submit your cute panda once your're done! Peace out all!
 

READ MORE

Samsung Corby 2 Android Mod Theme

Hi, want to make your Corby 2 look like android ? then just do this

1.Download MUI Clock Widget
http://corby2geek.mywapblog.com/files/miuiclock.zip
2.Download Google Search Android Widget
http://corby2geek.mywapblog.com/files/googlesearch.zip

3.Download Droid1 theme
http://corby2geek.mywapblog.com/files/droid1.zip

4.Rename droid1.zip to droid1.smt, googlesearch.zip and muiclock.zip to googlesearch.wgt and muiclock.wgt

5.Send all of this file to corby 2.

6.Open My Files > Themes > and click droid1.smt and set it as theme, click googlesearch.wgt and muiclock.wgt to install.

7.Go to home and select two widget that you has install before this.

Viola, now your corby 2 is look like android!! TK and enjoy biggrin
READ MORE
HI everyone, wanna play Angry Birds on your Corby 2 ?

Here is the Angry Birds full touchscreen jar for Corby 2 and this games played landscape on your Corby 2.

The graphic quality is still ok and this game run smoothly on Corby 2 biggrin

Download its here

mobiletouchgames.info/Games/Landscape/ABRio(www.corby2downloads.com)LS.jar
READ MORE
HELLO all, here i want to give some trick for CORBY 2...

Take screenshot on your CORBY 2 :
just press home + lockscreen button at the same time until you see message that a screenshot has been captured.

Do screen test :
go to Keypad and type star+#0+star+#

Web browser History :
go to bookmarks then press Bookmark and at the same time slide it to left untill you see History

Refresh avaible wifi network at homescreen :
at homescreen press pull down menu (arrow icon at icon list) and press wifi on/off then touch wallpaper to close pull down menu and press wifi on again and you will see avaible wifi network
READ MORE
HELLO all, here i want to share how to get free internet for your Samsung Corby II using Maxis.
.
For Maxis user

First go to Settings > Connectivity > Network > Connections and then you will see Maxis WAP GPRS. Select it and edit the Access name colum from net to Unet and just change the proxy server and ip to 202.75.133.49:80. Then press Save and exit from setting.

Then go to Menu > Games and Other and press the bottom menu and go to Connections and select Maxis WAP GPRS or other ap that you've edit.

After that download Opmin6.1maxis.zip and rename it from .zip to .jar and then send it to your corby 2.

Then open your corby 2 and make sure your credit balance is under RM1 or this trick will use your credit!!

After that install app that you downloaded and select allow and ask once if you get a notification when installing this app. After finished you can enjoy free internet. yeaywink

Goodluck and thank youbiggrin
READ MORE

Michel Telo Bara Bara Bere Bere 2012


lyrics :

Bara bara bara
Bere bere bere
Bara bara bara
Bere bere bere bere
Bara bara bara
Bere bere bere

E quando eu te pegar você vai ficar louca
Vai ficar doidinha, doidinha dentro da roupa
Quando eu te pegar vou fazer diferente
Tenho certeza, vai pirar a sua mente

A bebida tá subindo
A cabeça enlouquecendo
O clima tá esquentando
Só vai dar eu e você
Pra gente então fazer

Bara bara bara
Bere bere bere
Bara bara bara
Bere bere bere bere
Bara bara bara
Bere bere bere
Bara bara abara
Bere bere borá

[Instrumental]

Bara bara bara
Bere bere bere
Bara bara bara
Bere bere bere bere
Bara bara bara
Bere bere bere
Bara bara abara
Bere bere borá
READ MORE
READ MORE

How to Add music File at blog

Step 1: First, upload the music file to any free file hosting servers on the net. Once you upload, they will provide you with a direct link to that music file.
http://sample-server.com/uploads/from-the-moon.mp3
Step 2: Here is the code you need to add music to your blog
<embed width="250" height="50" autostart="false" src="MUSIC FILE URL"/></embed>
Step 3: You can add the music player anywhere you want in your Blogger blog..
Sidebar: If you want to add in sidebar, go to Design --> Add a gadget --> HTML / JavaScript --> and paste the code and save it.
Blog Post: If you want to embed music file to any specific blog post, Paste the code in 'Edit html' mode and save it.
Step 4: Done / Enjoy
clarification code above:
width: width of the music player
height: height of the music player
autostart: values : false or true
MUSIC FILE URL: the direct link to your music file
In this example, MUSIC FILE URL is http://sample-server.com/uploads/from-the-moon.mp3
READ MORE

Cara Buat ShutDown Virus


Pernah tertanya-tanya apa gurauan baru anda boleh tampil dengan untuk membuat adik perempuan anda  takut? Berikut adalah mudah, tetapi sangat berkesan. Hanya menukar salah satu ikon desktop anda (iaitu Internet Explorer) dengan satu palsu dan kotak amaran akan pop-up yang akan menutup komputer anda dalam masa 30 saat. Bukankah yang cukup untuk membuat menjerit kakak lil 'apabila dia melihat permainan anak patung Barbie dia pergi selamat tinggal? Berikut adalah bagaimana ia berfungsi:
Ini tidak benar-benar virus ... hanya program penutupan yang akan membuat kawan-kawan anda aneh keluar.
Pertama, anda akan perlu untuk mewujudkan jalan pintas. Anda boleh membuat jalan pintas dengan mengklik kanan pada desktop anda dan memilih Baru, dan kemudian, Shortcut.
Satu kotak Buat Shortcut maka harus membuka. Dalam kotak itu, menulis perkara-perkara berikut:
shutdown-s-t 30-c "VIRUS DIKESAN!"
(nota:. nombor 30 boleh digantikan oleh mana-mana nombor lain nombor yang sepadan dengan bilangan saat sebelum komputer akan shutdown Di sini saya telah memilih 30 untuk mempunyai masa yang cukup untuk menutup ia sebelum komputer saya menutup Juga, mesej antara petikan boleh digantikan dengan sesuatu seperti "ANDA TELAH dIJANGKITI oLEH Virus Trojan A" atau beberapa idea yang hebat yang lain. Walau bagaimanapun, mesej mesti antara petikan.)
Selepas itu, hanya klik pada Seterusnya dan kotak dengan nama Shutdown akan muncul. Tukar nama yang anda mahu ia. Dalam kes ini, saya telah memilih Internet Explorer tetapi ia sentiasa boleh dinamakan semula bagaimana anda suka.
Selepas menamakan ia, klik pada Selesai ... di sini adalah virus penutupan anda! Tidak sangat meyakinkan dia? Nah, dalam kes itu mari kita menukar ikon kami!
Klik kanan pada penutupan Internet Explorer icon anda (atau mana-mana nama yang anda berikan) dan pilih Properties.
Pilih Icon Perubahan
(Nota: Sebuah kotak yang mengatakan "sistem 32 tidak mempunyai apa-apa ikon memilih dari senarai diffrent" atau sesuatu seperti itu boleh pop-up, jika ia tidak hanya klik pada Ok)
Sekarang ... ia bergantung kepada apa yang anda telah menamakan virus penutupan anda ... Jika anda memilih Internet Explorer tatal sepanjang jalan ke kanan dan anda akan mendapati ikon. Jika anda tidak memilih Internet Explorer berasa bebas untuk memilih ikon yang berbeza ... Ingat ia telah menjadi sesuatu yang orang akan klik pada.
Sekarang Berikut Icon anda ... Kini ia kelihatan seperti sesuatu yang orang akan klik pada
Untuk menutup program tersebut, pilih menu permulaan dan klik pada Run ...
tulis: Shutdown -a
and the program should shutdown immediately.
(Note: To shut it, you can also do a new shortcut but instead of writing shutdown -s -t 30 -c "VIRUS DETECTED" write this: shutdown -a
and call it Shutdown abort..So instead of closing it with Run you can just click on your shutdown abort shortcut.)
Bersenang-senang takutkan keluar kawan-kawan anda / keluarga ... Dan jangan lupa untuk menutup atau meletakkan jangka masa yang lebih panjang supaya anda akan mempunyai masa yang cukup untuk menutup.
AMARAN: Program ini akan benar-benar penutupan komputer anda. Ia mungkin menyeronokkan untuk dilakukan kepada adik-beradik dan kawan-kawan atau sedikit tetapi menahan diri dari menggunakan ia jika seseorang itu sebenarnya bekerja di dalam komputer, kerana mereka akan kehilangan semua maklumat mereka.
Enjoy!


READ MORE


 copy code tu.

javascript:R=0; x1=.1; y1=.05; x2=.25; y2=.24; x3=1.6; y3=.24; x4=300; y4=200; x5=300; y5=200; DI=document.getElementsByTagName("img"); DIL=DI.length; function A(){for(i=0; i-DIL; i++){DIS=DI[ i ].style; DIS.position='absolute'; DIS.left=(Math.sin(R*x1+i*x2+x3)*x4+x5)+"px"; DIS.top=(Math.cos(R*y1+i*y2+y3)*y4+y5)+"px"}R++}setInterval('A()',5); void(0);

 pastu klick f12
then tekan console
pastekn code tu
tekan enter
dan tengok ap akan berlaku

READ MORE

cara buat Flying Dragon

Cara Membuat Naga Terbang diblog


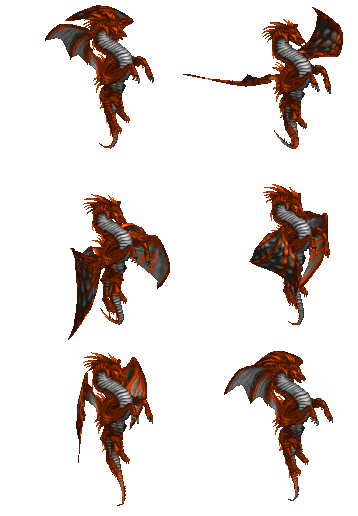
Ok ! Kali ini admin akan share , tutorial cara membuat naga yang melayang di blog kita masing - masing , itu jga kalau kalian ingin membuatnya . Jika tidak ya sudah... Gambar naganya beragam loh ,dan widget naga terbang ini mungkin dapat memperunik blog anda akwkwk...

Kalian tinggal pilih gambarnya sesuka anda . Terus tinggal pasang scriptnya , cara nk buat:

Tutorial :

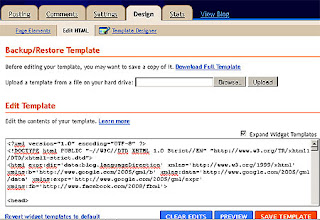
  • Klik "Design" kemudian klik "Edit HTML" setelah itu klik centang pada "Expand Widget Templates", seperti gambar dibawah ini.


  • Cari kode </Body> pada template blog (tekan tombol keyboard CTRL+F untuk menampilkan kotak pencarian di browser dan mempercepat pencarian) kemudian copy kode di bawah ini dan paste di atas kode </Body> tersebut.

    <script language="javascript">
    var floatURLimage="https://lh5.googleusercontent.com/-r7mvQKGqGKw/TztqZVj4rcI/AAAAAAAAA8c/fdlNkkdyriI/s800/Flying-Rainbow-Dragon-Animated-Image.gif";
    </script>
    <script language="javascript" src="http://monozcore-project.googlecode.com/files/DragonScript.js"></script>

    - Keterangan :
    • Kode yang berwarna biru merupakan URL Link Gambar, Jika Ingin mengganti gambar , ini gambar yang ada dibawah ini ...

  • Klik "Save" dan lihat hasilnya...

Pilihan Gambar Naga :
  • Rainbow Dragon 
     
    Image Link :
    https://lh5.googleusercontent.com/-r7mvQKGqGKw/TztqZVj4rcI/AAAAAAAAA8c/fdlNkkdyriI/s800/Flying-Rainbow-Dragon-Animated-Image.gif

  • Cute Dragon 
     
    Image Link : 
    https://lh4.googleusercontent.com/-V0v4FFy-tEI/TztrQd5XRFI/AAAAAAAAA8o/jngOlaB9Wr8/s800/Flying-Cute-Dragon-Animated-Image.gif

  • Fire Dragon 
     
    Image Link :
    https://lh3.googleusercontent.com/-oFGtUHiNRxY/TztrQhkJgcI/AAAAAAAAA8s/epssP_PM_c0/s800/Flying-Fire-Dragon-Animated-Image.gif

  • Green Dragon 
     
    Image Link :
    https://lh6.googleusercontent.com/-RsxhExfnaI0/TztrR5U3fQI/AAAAAAAAA88/JGoaeNdqXH0/s800/flying-green-dragon-animated-image.gif

  • Red Dragon 
     
    Image Link :
    https://lh6.googleusercontent.com/-RsxhExfnaI0/TztrR5U3fQI/AAAAAAAAA88/JGoaeNdqXH0/s800/flying-green-dragon-animated-image.gif

  • Grey Dragon 
     
    Image Link :
    https://lh5.googleusercontent.com/-bSPHoql1wR0/TztrRbikGDI/AAAAAAAAA80/gRzuw3I_MlA/s800/Flying-Grey-Dragon-Animated-Image.gif
READ MORE

Nak Traffic Ke Website Free? Meh Bace Sini


traffic ke websites,free traffic,1000 hits,global auto surf,dapat traffic ke websites
Gambar dari Yahoo Image
Bila berbual pasal TRAFFIC dan UNIQUE VISITOR macam kat post aku yang lalu mesti ramai yang "uish,macam mana tu?" , "aku pun nak gak UV ni". Tapi persoalannye, adakah korang tau macam mana nak dapatkan traffic ke blog atau websites korang? Tau macam mana nak dapatkan UV setinggi ini? xde la tinggi mane pun bro dan secara tak langsung dapat income untuk portal pengiklanan yang memang terbukti menjana duit sehingga kini..Aku tidak nafikan yang Teknik SEO yang berkesan mampu menjana traffik yang tinggi, tapi aku tetap juga guna beberapa teknik lain yang bukan SEO.

traffic blog,websites popular,auto traffic

Click untuk tumbesaran sempurna

Mudah je actually,korang hanya perlu ushar kat sini www.globalautosurf benda ni free je bro..nak guna pun senang je.

Apa itu GlobalAutoSurf?

GlobalAutoSurf is a FREE to use State-of-the-art Internet Marketing Portal. We have everything you need to market your Website, Blog, Affiliate page, Business Opportunity, Product or list building. Our features include a rock solid, cheat proof AutoHits system, Banner Exchange, Text ads exchange, even advanced features like Ad Tracking and more are at your disposal.
Kiranya websites ni tolong korang untuk dapatkan traffic la...Excited tak?Jom ushar cara-cara nak daftar.

Cara nak Daftar :

  • mula korang bukak websites ni GlobalAutoSurf
  • korang daftar la macam biasa,emel tu penting sebab nak kene verify lepas tu
  • log in emel,verify la account GlobalAutoSurf korang tu
  • lepas dh verify tu korang g websites GlobalAutoSurf balik, korang try login
  • dah login tu korang "add la URL" blog korang (click kat gambar arrow kuning tu)
traffic mudah ke websites,cara dapat unique visitor,traffic ke blog
Klik gambar untuk pemahaman

Klik gambar untuk pemahaman

  • lepas tu korang tunggu la sampai URL blog korang tu di approve,tunggu sampai kat tab "state" tu jadi enabled.(selalunya 1hari)
  • sementara menunggu tu korang boleh la "surf" untuk dapatkan point(point tu leh guna untuk tambahkan UV ke blog korang)
Klik gambar untuk pemahaman

Contoh websites yang akan korang "surf" bila klik button "Surf" tu

  • bila site korang dh approve keesokkannya,korang cuba cari gambar arrow kuning yang tulis "allocate" click kat situ
Klik gambar untuk pemahaman

  • lepas dah keluar,korang letak la berapa-berapa pun nilai korang suka,1000 ke dan click button "allocate".Benda ni penting sebab traffic akan datang melalui nilai yang korang letak.Kalu korang nak 1000 traffic yang datang ke websites korang letak la 1000.Lepas dah "Allocate" tu close je ataupun signout je.
Klik gambar untuk pemahaman

  • lepas tu korang tunggu je.dan check traffic ke blog korang selepas sehari.mesti naik punya lah.


So macam mana tips aku ni? Aku dah letak gambar untuk mudahkan pemahaman korang.Kalau gambar tak jelas,Klik kat gambar tu ok.Kalau korang nak tau bila kita daftar je automatik dapat 5000 points. Banyak kan? So bleh la korang habiskan dulu 5000 points tu dulu sebelum start "surf" hehe..Kalau ade yang tak jelas korang komen je kat bawah ni..Nanti aku bantu ape yang perlu.


READ MORE

Masa Sesuai Post Entri Di FB & Twitter

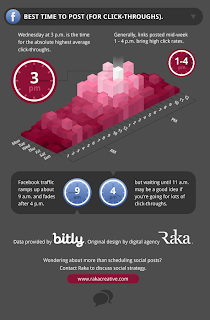
Hari ini aku ingin berkongsikan satu tips yang aku rasa agak penting dari meningkatkan traffik ke blog korang. Cara ini aku terjumpa di laman web Bit.ly diaman pihak mereka mengadakan satu kajian mengenai "Click-Throughts". Jadi, sekiranya korang ingin entri korang mendapat perhatian, produk jualan korang mendapat sambutan, mungkin dengan tips ini ada gunanya.

Masa Sesuai Post Entri Di FB & Twitter,masa untuk ping entri di Facebook, masa ping entri,waktu sesuai untuk ping entri,cara ntuk ping, masa untuk update blog

Berdasarkan kajian, masa yang dianggarkan sesuai untuk men "Tweet" entri korang di Twitter adalah pada pukul 1pm sehingga 3pm setiap Isnin hingga Khamis.

Manakalah masa sesuai untuk ping entri korang di Facebook pula ialah pada pukul 9am sehingga 4pm setiap hari dan elakan melalukan ping selepas jam 4pm. Turut dilaporkan bahawa hari Rabu jam 3pm merupakan waktu yang paling sesuai untuk ping entri di Facebook.

Masa Sesuai Post Entri Di FB & Twitter,masa untuk ping entri di Facebook, masa ping entri,waktu sesuai untuk ping entri,cara ntuk ping, masa untuk update blog

Untuk lebih banyak info, korang boleh rujuk di dalam gambar yang ada di entri ini.

By the way, kepada sesiapa yang ada Facebook, subcribe aku di fb http://www.facebook.com/WoshiProZaiBoshido

Sekian, terima kasih


READ MORE